- Home Page
- About
- Products
- News&Article
- Services
- Learning
- Contact
-
Cleaning
Endoscopy cleaning After procedure
PRE-CLEANING (in procedure room)
- Immediately wipe down the insertion tube and distal tip with a soft cloth soaked in a detergent solution prepared as per the manufacturer’s recommendation.
- Flush the suction channel at least 3 times, using at least 200mL of prepared detergent solution, in short, sharp bursts, until clear fluid is seen. Drain until all liquid is expelled.
- Connect the cleaning adaptor and flush the air-water channel with fresh water. Move forceps lever several times if cleaning a duodenoscope. Drain until all liquid is expelled.
- Attach the waterproof cap securely to the video connector. Detach all removable components in a covered container to the cleaning room.
Dry test
- Ensure the leak tester has no fluid/moisture inside the tubing, connector, or bulb.
- Attach the leak tester to the vent port and pressurize the endoscope to 18.5-21.5 kPa (140-160 mmHg). Flex the distal portion of the endoscope in all directions, observing for a pressure drop. If no leaks are found, release pressure and disconnect the leak tester. The Leak test should last a minimum of 30 seconds.
- If a leak is detected. Follow the supplier’s instructions and send the endoscope to your provider for repair.
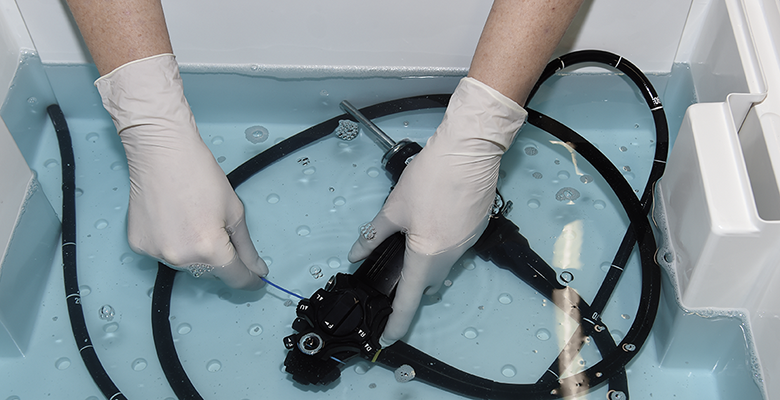
Wet test
- Immerse the endoscope in clean fresh water. Flex the distal portion in all directions. If any continuous streams of bubbles emerge, send the endoscope to your provider for repair.
- Immerse the endoscope and removable components (air/water and suction buttons, and auxiliary J-Port connector after being removed) in freshly prepared detergent solution (prepared as per the detergent manufacturer’s instructions). Thoroughly clean all external surfaces and removable components.
- Brush all cylinders thoroughly.
- Brush all channels (including the water jet and/or balloon channel if present) from the control body at least 3 times, until no debris is seen on the cleaning brush.
- Brush the suction channel to the distal end of the insertion tube.
- Brush the suction channel by lining the brush with the dot of the endoscope housing, then place the brush at a 2 o’clock angle.
- Pass brush through the biopsy channel through to the distal end.
- Attach the Fujifilm cleaning adaptor supplied with the endoscope and flush all channels with prepared detergent solution three times. Use a small syringe for the water jet or balloon channel if present.
RINSING AFTER CLEANING WITH ENZYMATIC FLUID
- Rinse the endoscope and all removable components with fresh, clean water. Flush water through all channels three times using the Fujifilm cleaning adaptor. Use a small syringe to pass water through the water jet or balloon channel. Purge water from all channels using forced air.
- Connect to Automated Endoscope Reprocessor or continue with Manual Disinfection procedure below.
- Immerse the endoscope and removable components in a high-level disinfectant solution.
- Verify the minimum effective concentration of the disinfectant solution before use.
- Follow the disinfectant manufacturer’s instructions for soaking parameters and other detailed instructions.
- Inject disinfectant solution into all channels using a clean Fujifilm cleaning adaptor. Ensure that all channels are filled with disinfectant and that no air pockets remain within the channels.
- RINSING AFTER MANUAL DISINFECTION
- Thoroughly rinse all surfaces and removable components. Flush sterilized water through all channels using a clean Fujifilm cleaning adaptor.
- After rinsing the endoscope and removable components, dry the outside of the endoscope with a clean lint-free cloth and flush air through all channels. DO NOT USE a pressurized hose to flush the auxiliary J-Port channel. High pressure may cause damage to the auxiliary J-Port channel.
- Flush all channels with 70% alcohol followed by air to facilitate drying while in storage.
- STORAGE
- Store all removable components separately to promote aeration of channels and ports. Do not store the endoscope in its carrying case. Ensure that the endoscope is hung securely with the insertion tube and light guide cable hanging freely in a well-vented storage cabinet.
- Remove the protective cap from the end of the video connector while storing.